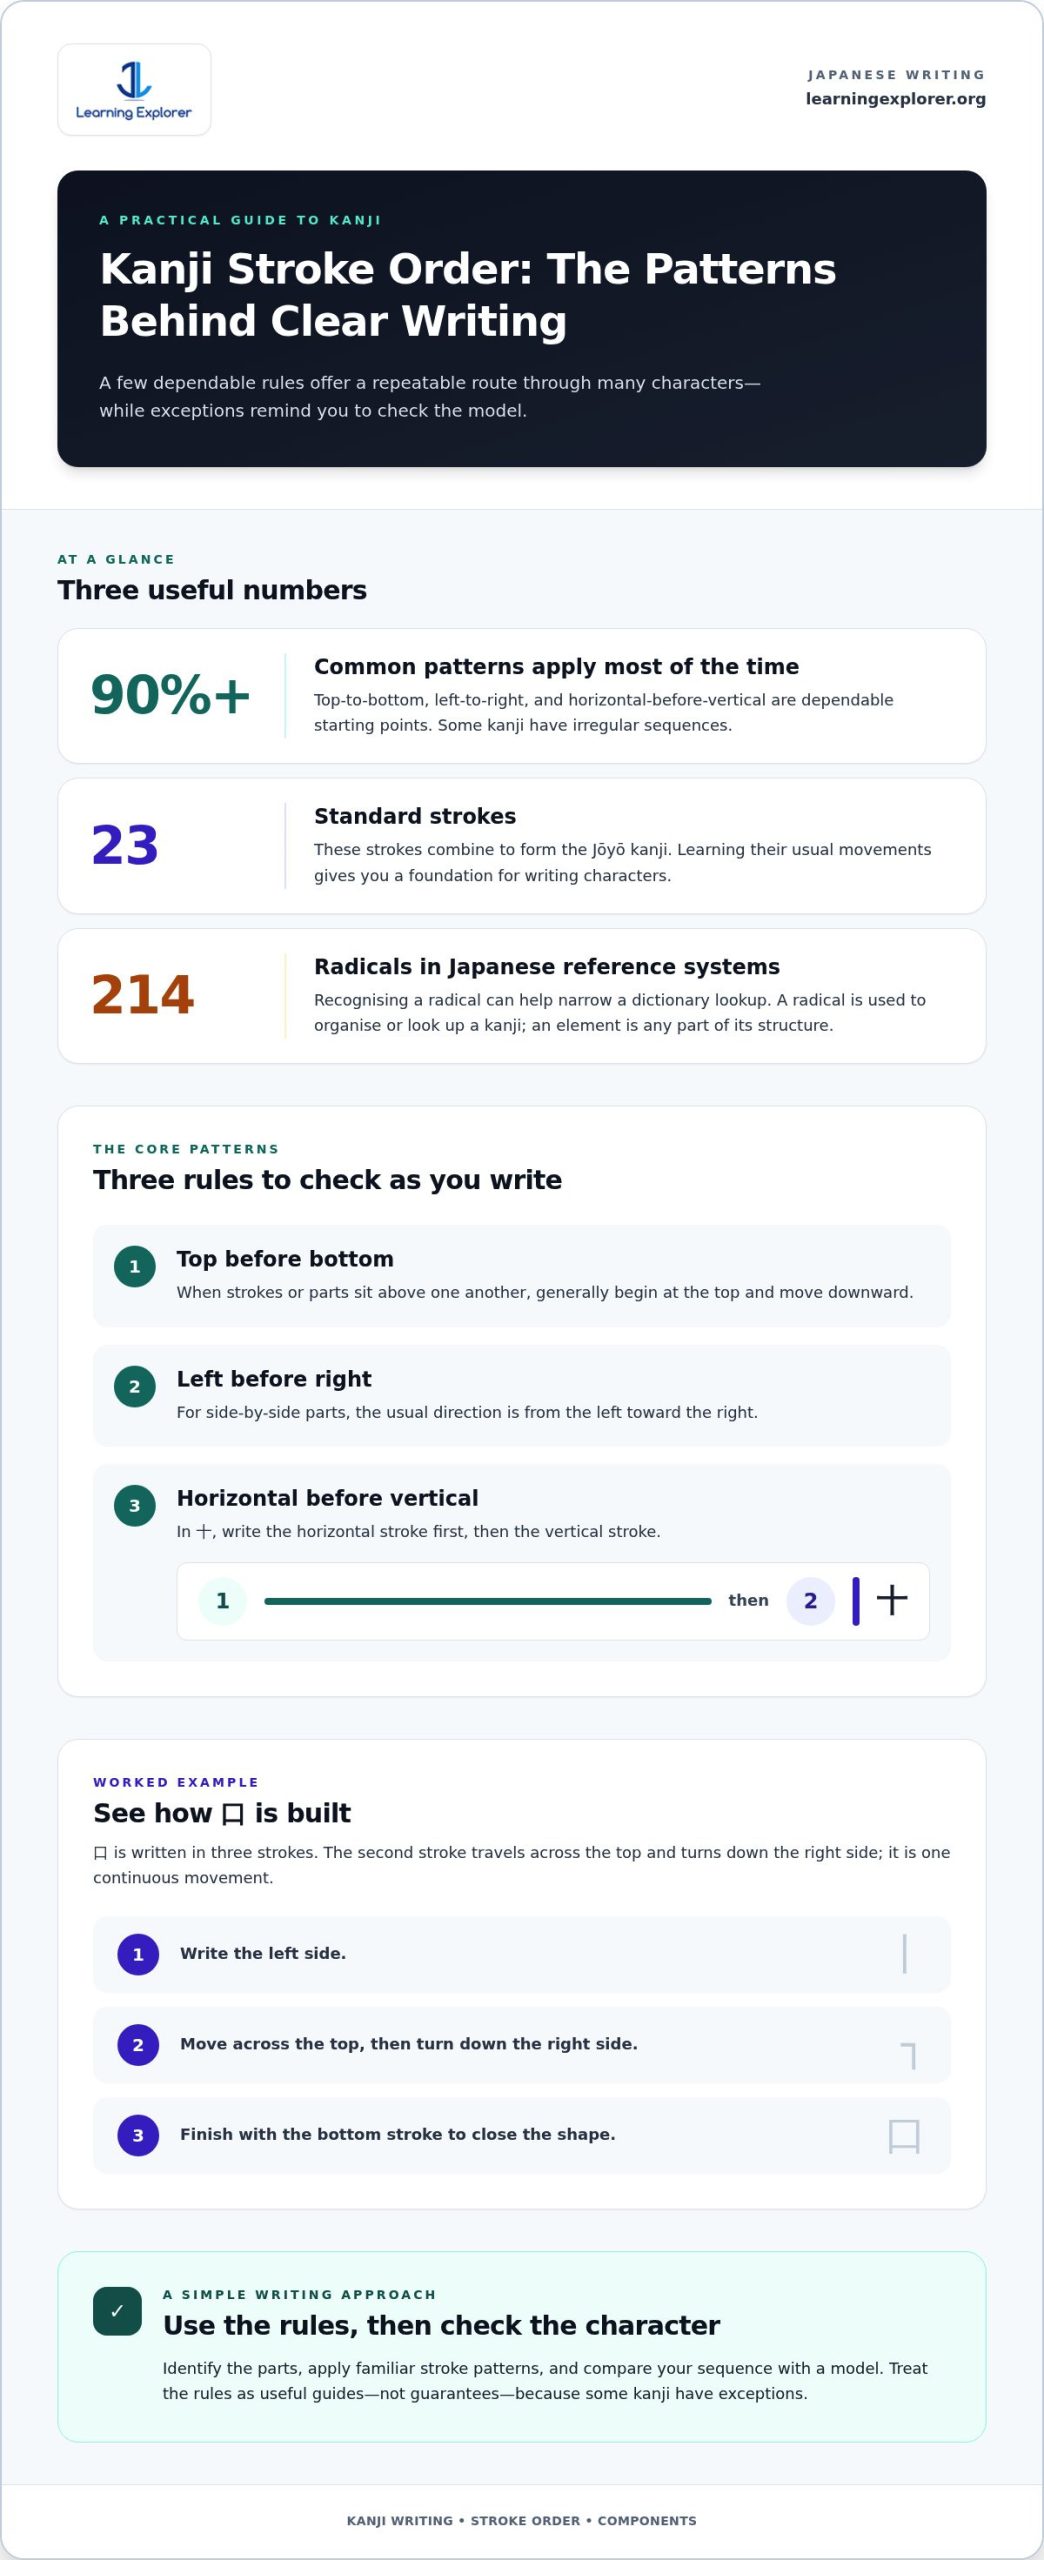
A kanji’s parts can guide your pen, but they don’t all play the same role. Writing Japanese kanji for beginners starts with a few dependable stroke-order patterns: work generally from top to bottom and left to right, and write horizontal strokes before vertical ones. The 23 standard strokes combine to form the Jōyō kanji.
If you’re learning writing Japanese kanji for beginners, it helps to know that radicals and elements are not the same. A radical is a component used to organise or look up a kanji, while “element” is a broader term for any part of its structure. The terminology can be confusing at first.
Learn how stroke order works, when it helps, and how writing practice supports Japanese literacy. The basic rules can help you understand kanji components, while reading and writing practice show how handwriting fits alongside the other Japanese writing systems.
Key Takeaways
- Learn why handwritten kanji may look different from printed forms, and what to focus on when reading each style.
- Use animated demonstrations to see how a character is built, rather than trying to memorise its shape all at once.
- Apply common stroke-order patterns to unfamiliar kanji, while recognising that some characters have exceptions.
- Make writing practice part of a wider routine that connects kanji recognition with reading and Japanese literacy.
- Understand how kanji fits alongside hiragana and katakana, so your study plan supports more than handwriting alone.
Should I learn each kanji’s stroke order?
Yes, learn the standard order as you study each kanji, but don’t treat every character as an isolated puzzle. Stroke order gives your hand a repeatable route and helps keep handwritten forms clear. The 23 standard strokes combine to make the Jōyō kanji. Start with the order shown in your learning materials, then practise a character in context, such as writing 日 in a familiar word.
Printed and handwritten Japanese can look different, even when the kanji is the same. A printed font has crisp edges and consistent spacing; handwriting reflects the writer’s movement, pen, and available space. For example, 日 may look more regular in print than in a quick handwritten note. Focus on the character’s components and how its strokes connect, rather than expecting every handwritten form to match a font exactly.
For beginners, look for a structured kanji workbook that shows stroke direction, numbered steps, readings, and example words. Choose one with space to write and review, so you can compare your 日 or 人 with a model. A clear sequence helps connect the printed character with the movements used to write it.
How many kanji should a beginner learn first? Begin with a small, useful group tied to your current reading or study materials, then add characters as they appear again. About 2,000 kanji are needed for literacy, but that is a long-term reference point, not a first target.
What are useful beginner kanji and their meanings? Start with familiar, concrete examples: 人 means “person,” 日 means “sun” or “day,” and 水 means “water.” Learn each character with a word or phrase. Context helps distinguish meanings and recognise the character when reading.
What common mistakes should beginners avoid when writing kanji? Don’t copy only the outer shape or rush through the strokes. Follow the model’s sequence and keep the components proportionate. Printed proportions are not the only correct form for handwriting. For example, compare your 木 with a model, then adjust the spacing and stroke direction instead of tracing the outline repeatedly.
Handwriting lookup makes stroke order useful beyond neatness. If you can draw an unfamiliar character, a handwriting input tool may help identify it when typing or reading. Write the visible components carefully, then compare suggested matches with the source text. Knowing radicals can also support dictionary searches: Japanese kanji reference systems use 214 radicals, and recognising a component can narrow a lookup.
Animated stroke demonstrations
An animation breaks a finished kanji into movements you can observe. Watch 口, which is written in three strokes: the left side, the top and right side, then the bottom. This shows how the visible outline is formed. A still image shows the result, while an animation reveals stroke direction, order, and where each movement ends.
Use each demonstration actively rather than letting it play in the background. First, watch the complete character. Next, replay it while naming each stroke’s direction. Then pause after each movement and copy it on paper or a screen. For 口, notice how the second stroke moves across the top before turning downward. The final stroke closes the shape at the bottom.
Animations can also make component boundaries easier to see. A kanji may contain several familiar shapes, but its complete sequence still follows a particular order. Notice where the demonstration moves from one component to another. If it pauses or numbers the strokes, use that cue to separate the movements instead of copying the outline as one continuous drawing.
Try this short viewing routine with a character you are studying:
- Observe: Watch the full animation without writing, and identify the starting point.
- Describe: Say “down,” “across,” or “turn” as each stroke appears.
- Copy: Pause after each stroke and reproduce the same movement.
- Recall: Hide the model, write the character, then compare the sequence.
This routine helps you distinguish a stroke from a visual segment. In 口, the top and right edge are one continuous stroke, not two separate lines. Copying only the final outline can leave you unsure where to begin. Replaying the movement gives you a clear starting point and a sequence to practise.
Use animation alongside deliberate handwriting, not instead of it. After watching a character, write it from memory and check both its shape and sequence. If your version differs, replay only the part that caused difficulty. For example, revisit the turn in 口 instead of watching the entire demonstration again. Focused review makes each replay answer a specific question.
For a useful study session, choose one unfamiliar kanji from your current reading and observe its animation before writing. Record the character, its component parts, and any stroke that changes direction. Then return to it later without the animation. Learners who also want to build spoken Japanese alongside kanji study can explore Japanese conversation learning.
How to determine kanji stroke order
Use a few recurring patterns to predict a kanji’s sequence. Most characters follow top-to-bottom and left-to-right movement. Horizontal strokes usually come before vertical strokes, as in 十, where the horizontal line precedes the vertical. These patterns work at least 90% of the time, but some kanji have irregular sequences that need individual attention.
When a character looks complex, identify its components before writing. Then apply familiar patterns within each part and across the whole form. For example, 木 has a horizontal stroke, a vertical stroke, and diagonal branches. Breaking it into visible movements makes the sequence easier to follow than copying the outline all at once.
- Horizontal before vertical: In 十, write the horizontal stroke before the vertical stroke.
- Top before bottom: Begin with upper components, then continue downward through the character.
- Left before right: Move across a kanji from its left side toward its right.
- Vertical between diagonals: If symmetrical diagonal strokes flank a vertical stroke, write the vertical first.
- Crossing diagonals: Write the right-to-left diagonal before the left-to-right diagonal.
- Enclosures: For a full or partial enclosure, write three sides, add the contents, then close the bottom when needed.
- Bottom-left component: Write a component such as ⻌ after the rest of the kanji.
- Dots and crossing strokes: Small dots usually come last, while a stroke crossing others follows the strokes it crosses.
These patterns are guides, not a substitute for observing each character. A dot at the top may come early, and a small stroke inside a larger component may follow that component’s sequence. In a kanji with an enclosure, the final bottom stroke may close the shape only after you write its contents. Look at the whole structure before deciding where a small mark belongs.
Use this four-part check when you meet an unfamiliar character. First, identify its main components. Next, locate the highest and leftmost parts. Then apply a relevant direction pattern, such as horizontal before vertical. Finally, compare your predicted order with a reliable stroke diagram. This helps you learn the logic rather than memorise unrelated sequences.
Complex kanji can often be written component by component, moving from top-left toward bottom-right and applying familiar patterns within each component. Still, check unusual forms individually. A crossing stroke may follow the lines it passes through, while an exceptional dot may appear earlier than expected. Treat each pattern as a clue, not a rigid formula.
Interactive writing practice
Interactive practice connects seeing a kanji with writing it yourself. A tracing screen, printable grid, or blank notebook can support different stages. Start with a model of 学, then trace its strokes while paying attention to the character’s structure. Next, cover the model and write 学 from memory. Comparing both attempts shows whether you recalled the shape or simply followed the guide.
Choose practice tools based on the feedback they provide. A digital activity may show stroke direction or let you replay a character. Paper practice, by contrast, makes spacing and pressure visible without a screen. Neither replaces careful comparison. After writing 校, check whether its left and right components remain distinct and balanced. If the character looks crowded, adjust the spacing in your next attempt.
Use an active practice cycle rather than tracing repeatedly without reflection:
- Study: Inspect the model for its components and proportions.
- Trace: Follow the displayed sequence or copy the model slowly.
- Recall: Hide the reference and write the kanji independently.
- Compare: Check the result against the model for shape, order, and spacing.
- Reuse: Write the character in a word, such as 学校, to connect form with reading.
Interactive quizzes can strengthen recognition, but writing tasks should ask you to retrieve the kanji, not just select it. For example, look at 学校, hide it, and try to write 学 from memory. Then uncover the model and identify what you missed. Was the top component misplaced, or did the lower strokes become too compressed? Naming the issue gives your next attempt a clear focus.
Track errors by type in a simple notebook. Make columns for “shape,” “stroke sequence,” and “spacing,” then record one example after each session. If 校 repeatedly looks uneven, practise placing its components before writing the full character. This record helps you choose what to work on next instead of reviewing every kanji equally. Keep successful characters on a separate review list, and revisit them in words you already recognise.
Connect kanji practice to short messages and notes. Write 学習, meaning “study,” or 会社, meaning “company,” after learning each character separately. Then compare your handwriting with a printed reference. This shows whether you can recognise the character in context and reproduce it without tracing. Interactive practice works best when each activity has a purpose: observe, attempt, compare, and use the kanji in meaningful text.
Japanese writing systems and kanji literacy
Japanese writing combines kanji with two phonetic scripts, hiragana and katakana. Modern Japanese uses 46 individual hiragana and katakana characters. Kanji often carry a word’s core meaning, while kana show grammatical endings, particles, and pronunciation. In 食べる, for example, 食 carries the central meaning, and hiragana completes the verb.
Hiragana appears in particles and word endings, as in は, を, and ます. Katakana commonly represents loanwords and some names, as in コーヒー for “coffee.” These scripts work together in ordinary sentences. Recognising kanji alone may not be enough to understand how a sentence connects; kana helps reveal grammar and reading.
Hiragana and katakana can take under a week or two to learn, while kanji study grows over time. About 2,000 kanji are needed to be considered literate. Treat that figure as a long-range literacy goal, not a beginner’s first assignment. Start with characters that appear in your reading, then add new ones when they help you understand a word or sentence.
Kanji entered Japanese through historical contact with Chinese writing. Around 600 A.D., Empress Suiko sent people to China, and they brought back Chinese characters. That history helps explain why Japanese uses kanji alongside kana rather than relying on one script alone. Today, a sentence can combine all three, so recognising each script’s role supports fuller comprehension.
Build literacy by connecting character recognition, reading, and writing. For example, notice a kanji in a short message, identify the hiragana around it, then write the word and check its meaning. In a workplace note, kanji may make a key concept clear, while kana show how the sentence functions. Copying a character without reading the surrounding text misses this relationship.
A balanced beginner routine can cover three tasks. Read a short passage and mark unfamiliar kanji. Review each character with its reading and an example word. Then write selected words and return to the passage to see how the kanji works in context. This makes handwriting part of literacy rather than a separate exercise, helping you move from memorising isolated forms to understanding written Japanese.
To strengthen reading and speaking together, explore conversational Japanese learning as a complement to independent kanji practice.
Learning Explorer: Conversational English Course
Learning Explorer offers Japanese classes in Singapore, alongside English, Mandarin Chinese, Korean, Spanish, Thai, and Vietnamese classes. Choose Japanese study to build your skills in the language, and consider an English class separately if English is also one of your learning goals.
Choose a course based on the situations you want to handle. The Conversational English Course focuses on everyday spoken communication, while the Business English Course is for learners developing English for workplace settings. If Mandarin is also part of your goals, Learning Explorer offers Conversational Mandarin and Business Mandarin courses.
Keep your Japanese kanji practice focused on reading, character structure, and handwriting. Add English learning when you have a separate, practical communication goal. Contact Learning Explorer or visit learningexplorer.org to learn more.
Make Your Next Practice Session Count
Give your next study session a clear purpose: choose a character you’ve encountered, write it from memory, and use it in a word or short note. Writing Japanese kanji for beginners becomes more useful when each character connects to something you want to read or communicate. Keep a record of characters you can recognise but still find difficult to write. Use that list to guide your next review.
As your goals expand beyond written Japanese, consider which language skills would support your everyday or workplace communication. Learning Explorer offers language courses for learners building practical communication skills. Set a goal that fits your next step, then start a conversation with Learning Explorer about learning options.
Keep practising with curiosity. Each character you understand gives you another way into Japanese text.
Frequently Asked Questions
Are radicals and elements the same thing?
Not exactly. “Element” is a broad description, while “radical” commonly refers to a component used to organise dictionary entries. The terminology can vary between textbooks and lookup tools. If a dictionary search fails, try identifying the character’s listed radical instead of choosing a visually prominent component. This is useful when two kanji share similar shapes but appear under different entries.
Should I be able to write each kanji by hand?
No, not every learner needs to handwrite every character. Decide based on your tasks: handwritten notes require recall, while reading digital documents mainly calls for recognition. For example, if you need to write a Japanese name by hand, practise those specific characters. If you work mostly online, prioritise recognising kanji in emails and menus, then practise characters you need to reproduce.
What about onyomi and kunyomi readings?
Onyomi and kunyomi describe broad reading categories, but the word determines which pronunciation fits. For example, 人 is read hito in 人, but jin in 日本人. Save each new kanji with a complete vocabulary example and its pronunciation, rather than treating one reading as its only sound. This gives you a practical reference when the same kanji appears in different words.
What is a stroke, and why does it matter?
A stroke is one writing movement, and its count can help narrow a dictionary search. If you can’t identify a kanji’s reading, counting its strokes gives you another way to find a candidate. Compare the candidate’s overall shape with the character in your source before relying on the result. Similar-looking kanji can differ in small details, so use the surrounding word to confirm your choice.
Why do they use kanji in Japanese?
Kanji helps distinguish words that share a pronunciation. For example, kami may mean paper, hair, or a deity, written as 紙, 髪, or 神. The character makes the intended meaning easier to recognise in context. This is especially helpful in compact writing, where readers use both surrounding words and kanji to understand the message.
What are the basic rules for writing kanji stroke order?
Learn common patterns as a starting point, but use a stroke-order diagram as the reference for a specific character. A familiar-looking component doesn’t guarantee that the full kanji follows the sequence you expect. When writing Japanese kanji for beginners, keep a short record of surprising characters and review their complete forms, not just their disconnected components.
How can beginners practise kanji writing effectively?
Use a personal mistake log to turn practice into targeted review. After writing a character, record what went wrong, such as forgetting a component or making the shape difficult to recognise. Later, cover the model and try again before checking your note. For a workplace context, practise characters from a Japanese name card or meeting agenda you’re learning to read, so your review supports a real task.
What free apps and websites teach kanji writing?
Explore free digital dictionaries and writing practice tools that display character details and let you enter a kanji by hand. A guide to writing Japanese kanji for beginners is more useful if it also provides example vocabulary, so you can connect a character with words you actually encounter. Try searching for a known character first, then use the tool to practise finding an unfamiliar one.